


The following article and video show that even the most demanding games of today can be played on any web-enabled device:
http://www.techcrunch.com/2009/06/22/exclusive-otoy-goes-mobile-turns-your-cell-phone-into-a-powerful-gaming-rig/
A portable game platform with dedicated game controls such as the PSP connected via WiFi to a 3G phone seems more comfortable and mobile than the setup in the video. In my opinion this is just a proof of concept and I think that the real crowd pleaser will be the photorealistic virtual world with LightStaged characters.
Tuesday, June 30, 2009
Monday, June 29, 2009
Кирпич - вещь полезная!
Ине только в строительстве.
Я как-то писала, что мама моя работала когдато в ХПК Союзгосцирк вышивальщицей. Вот они использовали такое устройство под названием "камень". А поскольку я вновь увлеклась расшивкой одежды, то решила сделать себе такой.
Вам понадобится:
1. Кирпич. Нашелся отличный экземпляр на балконе :)
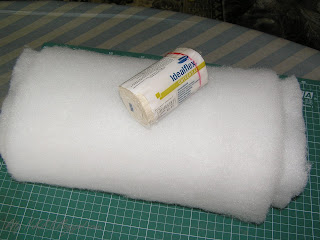
2. Синтепон.
3. Эластичный бинт.
4. Ткань для обивки. Желательно бархат или что-то ворсистое.
5. Немного энтузиазма и хорошее настроение.
Итак приступим.
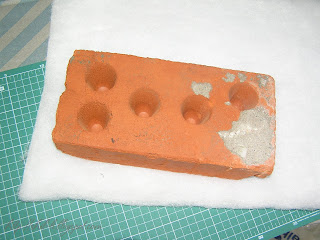
Кирпич обернем в синтепон. Слоя в 2.
Затем обмотаем эластичным бинтом. Сначало вдоль кирпича, а потом поперек. В принцие можно использовать и обычный бинт. Но эластичный потом лучше держит иголку.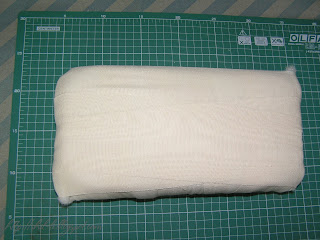
Теперь обшиваем это устройство тканью. Чтобы потом бисер и пайетки по ней не скользили, возьмите ткань с ворсинками. У меня был кусочек от стародавнего пальто :)
Обшить можно по разному. Я сделала валик, поскольку ткань была узковата. Вы можете обойтись одной деталью, зашив края конвертиком.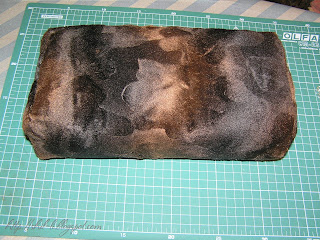
А тут я для примера накидала бисера и прикрепила ткань. Очень удобно брать бисер: сразу на иголку, а не рукой. Для микробисера - просто находка. Весь материал разложен как на палитре, а ткань при необходимости передвигаете.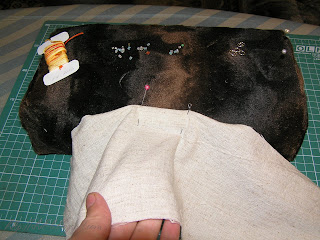
Чтобы попробовать удобно ли вам будет, обмотайте кирпич махровым полотенцем.
Я как-то писала, что мама моя работала когдато в ХПК Союзгосцирк вышивальщицей. Вот они использовали такое устройство под названием "камень". А поскольку я вновь увлеклась расшивкой одежды, то решила сделать себе такой.
Вам понадобится:
1. Кирпич. Нашелся отличный экземпляр на балконе :)
2. Синтепон.
3. Эластичный бинт.
4. Ткань для обивки. Желательно бархат или что-то ворсистое.
5. Немного энтузиазма и хорошее настроение.
Итак приступим.

Кирпич обернем в синтепон. Слоя в 2.

Затем обмотаем эластичным бинтом. Сначало вдоль кирпича, а потом поперек. В принцие можно использовать и обычный бинт. Но эластичный потом лучше держит иголку.

Теперь обшиваем это устройство тканью. Чтобы потом бисер и пайетки по ней не скользили, возьмите ткань с ворсинками. У меня был кусочек от стародавнего пальто :)
Обшить можно по разному. Я сделала валик, поскольку ткань была узковата. Вы можете обойтись одной деталью, зашив края конвертиком.

А тут я для примера накидала бисера и прикрепила ткань. Очень удобно брать бисер: сразу на иголку, а не рукой. Для микробисера - просто находка. Весь материал разложен как на палитре, а ткань при необходимости передвигаете.

Чтобы попробовать удобно ли вам будет, обмотайте кирпич махровым полотенцем.
Saturday, June 27, 2009
User Requests Answered...Fireworks and Plane svg files

Fireworks:
http://www.mediafire.com/?2m4hzy4ynnz

Airplane file:
http://www.mediafire.com/?iilq21jh5ex
Enjoy!
Denise from Boca
Friday, June 26, 2009
Back to School and Man at Work...free svg files

Back to school:
http://www.mediafire.com/?ymzzeyyu3mn

A humourous look at how hard men work:
http://www.mediafire.com/?dkhjzngqzik

Kids border:
http://www.mediafire.com/?ajdigjenwmz
Thursday, June 25, 2009
Free Playground Svg Files


Someone was looking for some accents for a playground page, so I made some and thought I would share with all of you.
Playground files:
http://www.mediafire.com/?vjnln3jyq2f
Trike:
http://www.mediafire.com/?immmk2zjziy
Wagon: NEW LINK...file name had extra space before svg..either fix on your copy or download again
http://www.mediafire.com/?ddmnmk050tq

Kids at play Title;
Easy to piece, no little pieces to glue on, they are all cut out of the previous layer.
http://www.mediafire.com/?mdwowmznjwg
Enjoy!
Denise from Boca
Tuesday, June 23, 2009
Patriotic Page TItles for the Fourth of July for Sale


THis collection of svg files is perfect for summer. Includes Fourth of July or Independence Day and Picnic page titles. Lots of Fourth of July accents. Dad at the grill and a picnic all set up to eat.
All for only $5.00.


Monday, June 22, 2009

Glamourous Poodle and a 4th of July Frame

Cute little poodle to cut on your cricut if you have the Sure Cuts A Lot software.
http://www.mediafire.com/?m5mfolwwzn4

4th frame
http://www.mediafire.com/?uhtkyex3umg
И снова зайцы или "в ожидании еще одного чуда" :)
Вам еще не надоели мои зайцы? :)
Я ни как не успокоюсь с ними. Так уж они мне нра. Но начну с начала.
Как-то раз я бродила по инету и наткнулась на очаровательную зайчиху. Любовалась я ею каждый день, а потом решила сотворить нечто подобное.
Я написала письмо Лене (Evidaida) с вопросами, и она мне в подробностях описала что и как делать. Но видимо опыту у меня еще маловато, ибо промучалась я с выкройкой, а результат так и не нравился. Я переделывала все части тела кроме рук, так что благодаря этому проекту у меня завелась коробочка с запчастями :) То носки не того цвета, то ноги и т.д. Шила долго и упорно, а сроки начали подпирать. Вот и вернулась я к старому проверенному материалу - тильде. Но все равно поэкспериментирую с другой выкройкой, когда время позволит.
Знакомьтесь - дабл-зайчик или 2 в одном :)

А делала я ее не просто так, а с умыслом, для хорошего человека делала. Вот ведь есть же врачи-гинекологи, которые не говорят: "Что это вы нифига не прибавляете, мышонка, что ли носите" или "у вас дети будут умственно неполноценные" (это так моей маме говорили, так что будем знакомы - я умственно отсталый мышонок :) )Но есть врачи, живущие под лозунгом "спокойная мама - здоровый малыш". Вот для такого доктора зайчиха и сделана.
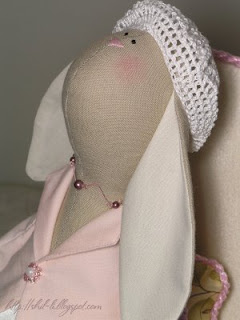
В процессе производства возникли трудности. Нигде не смогла купить стульчик. Все детский магазины исходила - ну такую порнографию делают, смотреть противно. Как всегда Марьюшки выручили - научили ж они меня делать кресло. Вот опыт и пригодился. Подушки посоветовал сделать муж. Сказал, что ей должно быть комфортно :)

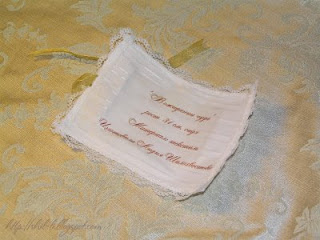
Думаете это просто подушка. Ан нет.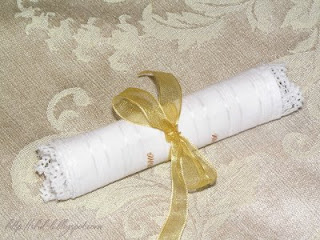
Это паспорт! Я ходила на курсы авторской куклы, где рассказали как сделать паспорт. В нем должно быть обязательно указано название, рост куклы, положение (сидя, лежа, стоя) - эта информация нужна для выставки, так как сначала присылают заявку с паспортом, а только потом куклу. Затем указывается материал и автор.
С другой стороны свертка - дарственная надпись.
Это мой первый сапожный опыт - мастерила обувь. Выкойку брала здесь. Только сделала их поУже.

А сумки вообще не должно было быть. Это обрезки от ботиков. У меня есть такая коробочка - предпомойка. Я туда ниточки и обрезки выбрасываю, чтобы с каждой мелочью до мусорного ведра не бегать. Вот я заглянула в нее случайно, а там лежит обрезок - ну прям вылитая сумка. Пришлось делать :) Да и дел-то было: выкроить, прошить, украсить, надеть..........главное уже было - ИДЕЯ!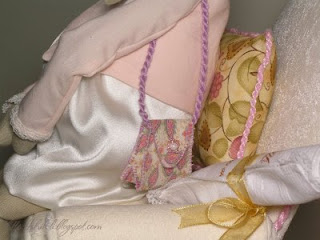
Спасибо, что дочитали до конца :)
Я ни как не успокоюсь с ними. Так уж они мне нра. Но начну с начала.
Как-то раз я бродила по инету и наткнулась на очаровательную зайчиху. Любовалась я ею каждый день, а потом решила сотворить нечто подобное.
Я написала письмо Лене (Evidaida) с вопросами, и она мне в подробностях описала что и как делать. Но видимо опыту у меня еще маловато, ибо промучалась я с выкройкой, а результат так и не нравился. Я переделывала все части тела кроме рук, так что благодаря этому проекту у меня завелась коробочка с запчастями :) То носки не того цвета, то ноги и т.д. Шила долго и упорно, а сроки начали подпирать. Вот и вернулась я к старому проверенному материалу - тильде. Но все равно поэкспериментирую с другой выкройкой, когда время позволит.
Знакомьтесь - дабл-зайчик или 2 в одном :)

А делала я ее не просто так, а с умыслом, для хорошего человека делала. Вот ведь есть же врачи-гинекологи, которые не говорят: "Что это вы нифига не прибавляете, мышонка, что ли носите" или "у вас дети будут умственно неполноценные" (это так моей маме говорили, так что будем знакомы - я умственно отсталый мышонок :) )Но есть врачи, живущие под лозунгом "спокойная мама - здоровый малыш". Вот для такого доктора зайчиха и сделана.

В процессе производства возникли трудности. Нигде не смогла купить стульчик. Все детский магазины исходила - ну такую порнографию делают, смотреть противно. Как всегда Марьюшки выручили - научили ж они меня делать кресло. Вот опыт и пригодился. Подушки посоветовал сделать муж. Сказал, что ей должно быть комфортно :)

Думаете это просто подушка. Ан нет.

Это паспорт! Я ходила на курсы авторской куклы, где рассказали как сделать паспорт. В нем должно быть обязательно указано название, рост куклы, положение (сидя, лежа, стоя) - эта информация нужна для выставки, так как сначала присылают заявку с паспортом, а только потом куклу. Затем указывается материал и автор.
С другой стороны свертка - дарственная надпись.

Это мой первый сапожный опыт - мастерила обувь. Выкойку брала здесь. Только сделала их поУже.

А сумки вообще не должно было быть. Это обрезки от ботиков. У меня есть такая коробочка - предпомойка. Я туда ниточки и обрезки выбрасываю, чтобы с каждой мелочью до мусорного ведра не бегать. Вот я заглянула в нее случайно, а там лежит обрезок - ну прям вылитая сумка. Пришлось делать :) Да и дел-то было: выкроить, прошить, украсить, надеть..........главное уже было - ИДЕЯ!

Спасибо, что дочитали до конца :)
Кулон из проволоки

Недавно я имела счастье попробовать свои силы в проволокоплетении. Вот что вышло со второго раза :) Первый не покажу. Полное ощущение, что по нему танк проехал :)
Второе уже куда ни шло. Накупила проволоки.Буду тренироваться.
Friday, June 19, 2009
Baby Tags: free svgs

Download here:
http://www.mediafire.com/?juzmynrziyd
More tags later today.. Need to turn them into stencils.
Thursday, June 18, 2009
Fairy Gate Card & Love Neverending Frame.Free Svg File


Two more projects from Tracie and my class today in my Jacksonville hotel room.
She learned to make a frame with text around it and how to trace and union pictures to make a frame or card too.
Download the files with the fairy gate card
http://www.mediafire.com/?gzyjcmdzymn
Just a fairy card standard format
http://www.mediafire.com/?mclyyolmzw2

Never ending love
http://www.mediafire.com/?y0yyyqjjjwi
Enjoy! If you live near Jacksonville Join me next month for lessons. Or if you live near Boca Raton I will be there next week. The next week I will be in Melbourne Florida area and can do inkscape/scal lessons there. I do get around! Email me if you live on east coast of Florida for a schedule!
Denise
Cut and Paste Page Title Free svg File

Today I met Tracie from Jacksonville and we played with the Cricut for a few hours. We made this die cut and thought we would share it with you! Enjoy!

Download the file here:
http://www.mediafire.com/?jyqjdyyjuwd
Make a 3-d Mouse Toy with a Marble for Wheels

I found this cute idea on the
http://www.thetoymaker.com/Toypages/07Marblemice/07marblemice.html/
web site. There are patterns for many paper toys available for free. Most you can print out a printed pdf file and hand cut. Being a Cricut owner, and thinking these might be a good CAMP project, I decided to create a Cricut svg pattern so we could make these easily and quickly. I even used the "gel pens" to add the details. If you were making these for kids, it would be fun for them to add all the details and decorate the mouse. Then you could set up an "incline" of some kind, and let them have "races".
What the bottom of mouse should look like with the marble

There is one problem. I don't have a Marble(use the large shooter marble which is about the size of a quarter). You will have to size the pattern so it fits. I set size to 8 inches and the circle was smaller than the quarter, 10 too big, perhaps nine is just right, but you'll have to cut one, insert the marble and see. These work like the original mouse we had on our computers that had a track ball in them. Remember those? and how you had to take them apart and clean off the goop that built up on them? Maybe not, as you are a youngster, and it was before your time!
Here is the top layer folded.


How the bottom looks without the marble

Download the file here:
File to CUT:
http://www.mediafire.com/?1y3qzydd4kz
Marker layer(worked better with gel pens from dollar tree, make them fit in your Cricut blade holder..do this layer first. Then enter load paper(without unoading paper), remove marker, put in blade again. Cut other layer)
http://www.mediafire.com/?ftnzmm5i5wz
Suggestion to make pen fit: Use tape, use rubber band, use art gum eraser, use pencil grips. Once you get it in, and figure out correct height, then mark it, so you can put it in next time at right spot.
Wednesday, June 17, 2009
It's a Boy Title: Free Svg

A simple title I created for a greeting card someone was making for a new baby boy. Thought I should post it here on my blog too, just in case someone else needs it
DOWNLOAD IT HERE:
http://www.mediafire.com/?3jl3fkmktwn
Haul your Treats in this Truck Favor Box: Free Svg to cut with SCAL
Here is a new favor box you can make on your Cricut if you have the Sure Cuts a Lot software and the svg file you download from dscrapbookingroom.blogspot.com and a little patience. This one is more challenging to assemble than the car.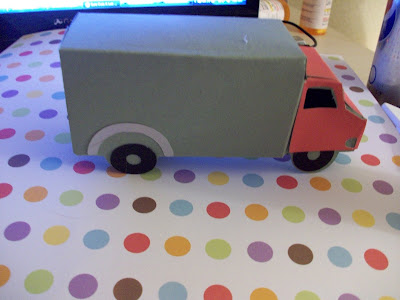
First crease all the folds on the foldlines. Notice that on the "cab" of the truck, those folds are "backwards" from the rest. The cab of he truck is narrower than the back of the truck and looks like it is coming out of the back of the truck once it is assembled.
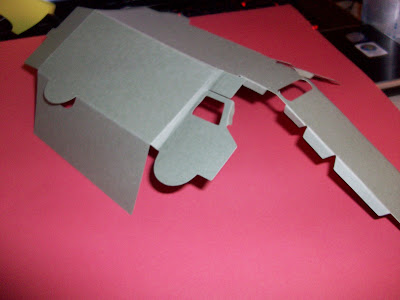
Glue the truck back.
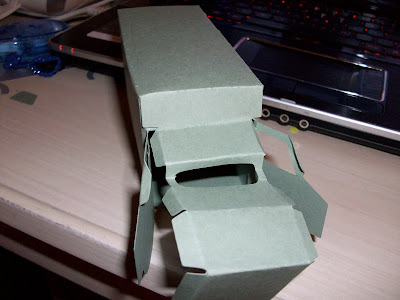
Prefold the front of the truck. Glue each section of the top to the side tabs. Use a quick drying, strong glue like Fast Grab Tacky Glue from Aleene's(bought at Michaels).
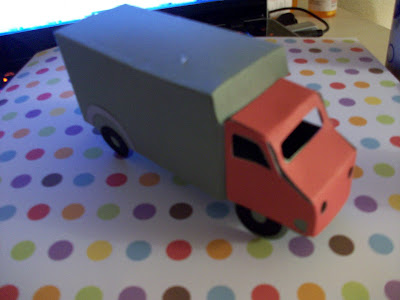
Attach the wheels and back bumper trim. Fold the cab and attach to the front of the truck, aligning the windows. The top of the side doors can be "folded under" and over the top of the door frame before the top is glued on to make for a neater appearance.
The two files you need are here:
The box(back of truck and cab)
http://www.mediafire.com/?no2rmnmazxi
The cab and wheels and bumper
http://www.mediafire.com/?zz10zxijrlq
Enjoy!
Subscribe to:
Posts (Atom)


.jpg)
.jpg)

.jpg)
.gif)


