Due note that this is only a guide for animating, not for modelling. So what we are going to look into is just the basics and simple steps on how to start animating any rigged character in Maya.

For this example, we'll be using the Andy rig. You can use any rig you want.
What You Need
- Any rigged character. You can find one in http://www.creativecrash.com/
- Autodesk Maya
An Extra Note to Know Beforehand...
If you use the Andy rig like in this example, you might want to adjust some settings before opening as you will see a very poor quality of the model (no eyebrows, badly textured clothes) when you open the scene. So do this first.
Go to Window -> Settings/Preferences -> Preferences.
Click on the Display section at the left hand box. Now look at the right-hand side for Baked Viewport Textures. Set it to High Quality as shown in the picture.
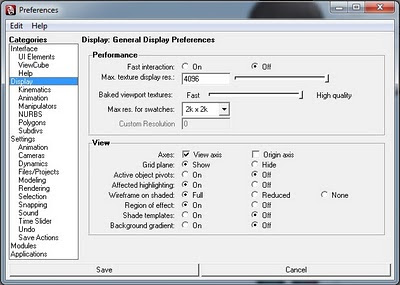
Restart Maya and you're good to go!
How to Get Started?
1. Open up Maya.
Alright, just run Maya!
2. Set your project file.
For any rig you download on the net, you are most probably going to have a folder with other folders such as scenes, sourceimages and so on. So click File -> Project -> Set...
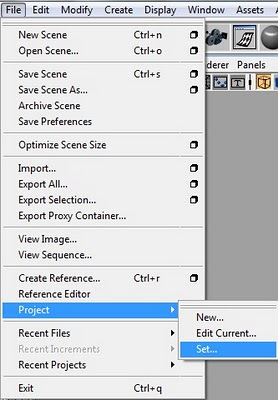
This will allow you to set the main project folder and load all textures and files which are included in your rigged character. So now, browse to the main folder of your rigged character and click OK.
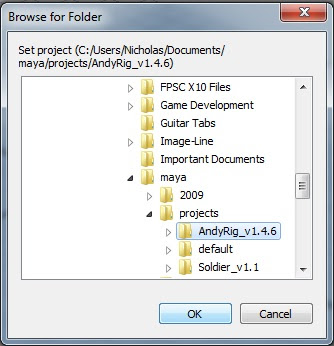
3. Open up a scene.
Now that you've set your project, Maya knows what you are working on and can get the texture files and other file directories right. But it's still blank! So let's open up a scene that contains the character. File -> Open Scene.

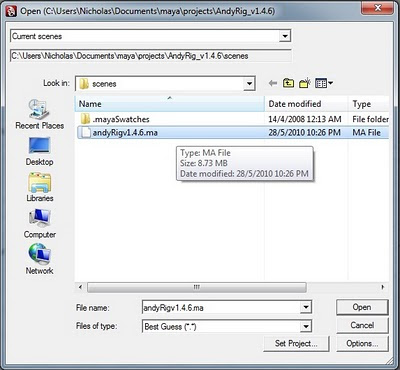
Once you opened the scene you should see your little character.
4. Animate!
Look at the little circles on your model. These are the controls which you can use to animate your character. Click on any of these and you can use the Rotate or Move tools to animate.
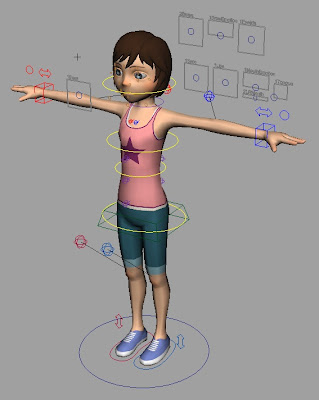
Once you have posed your character, you can press "S" to set a key within the time slider. You do not need to press the "S" key if your Auto-Keys (the small key at the bottom-right hand corner, if it's on it'll be red) is on.
Set a few keys with different poses and click Play at the bottom-right hand corner. See how your character moves!
Other Notes
If you do not know how the animation works, it is basically like a flipbook. Each keyframe (the numbers on the time slider at the bottom) represents a piece of paper in the flipbook. So when you play the animation, its like flipping through all the pages and there you have your animation. In Maya, all you have to do is to pose your character at a keyframe, set it, and move on to another frame to set another pose. Any keys in between which were not set will automatically try to transition to your next pose.
Now that you know how animation works and how to pose your character, look up some postures and tutorials on YouTube to see how to make a walk animation!
Love,
Nicholas.


.jpg)
.jpg)

.jpg)
.gif)


No comments:
Post a Comment