


 I start with these basic supplies. Aleene's Tacky Glue,
 a regular office hole punch, scissors,
a scrap of cardstock, my quilling tool,
and my ek success flower punch.
 I punch out 3 flowers and 1 partial flower. I call it the "B" shaped piece
 Using the office hole punch, I punch holes in the centers
of 2 of the punched flowers.

Using my scissors, I cut from one edge of the flower to the center.
 The punched out flower that wasn't punched, I make little
 cuts between all the petals. This will be the Base of the rose.

I use the end of my quilling tool to press into the center
This is a quilling tool. You can see the slot at the top.

I insert the quilling tool into the center of the flower and slide

I use the end of my quilling tool to press into the center
of the base. It makes it look kinda like a little bowl.

This is a quilling tool. You can see the slot at the top.

I insert the quilling tool into the center of the flower and slide
the edge that was cut into the slot of the quilling tool.

I slowly roll the flower around the quilling tool.

I roll both of the double punched flowers using the quilling tool.

I open one of the double punched flowers just a little bit.
I put the second double punched flower over the slightly opened

I slowly roll the flower around the quilling tool.

I roll both of the double punched flowers using the quilling tool.

I open one of the double punched flowers just a little bit.

I put the second double punched flower over the slightly opened
one and I rotate them so that the overlap eachother.

I put the "B" shaped piece into the quilling tool with

I put the "B" shaped piece into the quilling tool with
the rounded edges facing down.

I roll it all the way up.

While the "B" shaped piece is still rolled up, I slide it into the

I roll it all the way up.

While the "B" shaped piece is still rolled up, I slide it into the
centers of the double stacked, double punched flowers.
 This shows the "B" piece coming out the back side of the double
 This shows the "B" piece coming out the back side of the double
stacked, double punched flowers.

I add a drop of glue to the center of the base.

With the other parts still on the quilling tool, I place them

I add a drop of glue to the center of the base.

With the other parts still on the quilling tool, I place them
into the glue that is on the base.

This is what it looks like with all the pieces glued together. You could
After the glue dries, which takes about 10 mins., I take my

This is what it looks like with all the pieces glued together. You could
leave the rose like this and it would look pretty, but there is more
that you can do that makes it look more realistic.

After the glue dries, which takes about 10 mins., I take my
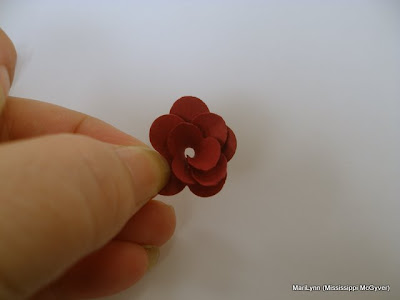
quilling tool and starting at the bottom layers, I curl each petal outward.


The finished rose.


The finished rose.


.jpg)
.jpg)

.jpg)
.gif)


No comments:
Post a Comment