Pages

Subscribe:
Showing posts with label free sure cuts a lot files. Show all posts

Wednesday, June 30, 2010

Cards Quilted by the Cricut


We were trying to think of something new for our cards we were making yesterday and decided to try some quilt patterns. At first I copied the patterns exactly, cutting all the various triangles and placing them on the paper. This drove me crazy! I decided we didn't need all the tiny triangles, just the larger shapes they made. We(or my friend Karen) added the "stitching" with a white gel pen.


Wednesday, June 9, 2010

Flower Cuts Font


I made another font today. The lower case gives you the background of the letter. The upper case gives you the inside of the letter. They are separated so you can cut them in separate colors.


Friday, June 4, 2010

Chinese food and Chopsticks


Download Chinese food and chopsticks

Someone requested chopsticks and before I could get them done, they said, nevermind! Anyway, I thought someone else might need them so I put them on my blog.

Enjoy!

Wednesday, May 5, 2010

Pedicure for Mom? New Card


Cut this 4 color/layer pedicure card to give to mom with her pedicure gift certificate.


Happy Mother's Day!


Wednesday, April 28, 2010

Exploding Clown Box


I had fun making this box today. Files coming soon. You could put photos on al the flaps and make it as a gift. Or deliver a gift card in style, by putting it in this cute box.


This box takes 4 cuts. I used two pairs of two-sided card stock. Then by switching the colors you can have lots of contrasting pieces, that you can use to embellish your box. 
The svg file for this clown box will be for sale on my blog for $3.00. You need to buy a 1 inch wooden bead for the head and a pompom for the nose(or cut one out of paper). I drew on the face with some sharpie markers.

Outer layer: fold 4 flaps towards the middle. Add Party cut to the rectangle background and put on front of box. Add clown shoes.  Use raised dots to attach various trims to side of box as desired.

Lid: fold to make lid and glue. Make present by glueing bow onto front. FOr 3-d effect, use raised dot to attach to second present layer. Glue arms on the side of the box lid, so that the hands can hold the present. Attach present to the clowns arms. Fan fold the neck "ruffle" , glue ends together and flatten. I glued it to a scrap of paper to keep it flat.
 Attach "rosette" or ruffle to top of box lid. Attach clown head. Attach nose to clown head. Make hat by folding circle into a cone shape. Attach hat to bead clown head.

Middle layer: fold 4 flaps towards middle. Attach with glue to outer layer middle square.

Inner Layer: fold 4 flaps towards middle. Attach with glue to middle layer.

Trim with various hearts, stars and squares.

Tuesday, April 27, 2010

Rosettes or Fanfold f lowers

Today on another blog, I saw examples of fan fold flowers. They used a punch I didn't have to cut the paper, but of course, I knew we could do it on out Cricut. To see her examples on pigtailspapertrails blog:


To see Folding instructions and examples


I had made a rosette the other day for a clown box I made, so I knew just what to do.

Here is the file to cut the paper, before folding. It adds score lines so you know where to fold.

Rosette file to cut paper strips with scalloped edges

Some trims for the middle of your rosette or flower

Scut file for paper strips

Sunday, April 25, 2010

Gazebos

Magarita was looking for a gazebo for a wedding card and I found two that I converted to svgs and shared with out surecutsalot yahoo group. Since not everyone is in our yahoo group, I decided to post the files here too.


Gazebo 1                             Gazebo with Dome

These would be nice for a wedding or garden card. You could put a silhouette of a wedding couple inside the gazebo. Enjoy!

Monday, April 5, 2010

Beer Bottle Card

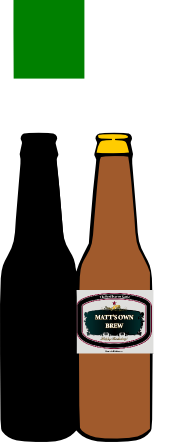
Someone asked for a beer bottle card or something to give a friend who brews his own beer. I made the card then found this label site that lets you make your own label with a message on it. Then you can print and cut the label to put on the beer bottle, giving it a more realistic look, than if you tried to cut it on your cricut.

That site to make your label is

http://start.beerlabelbuilder.com/
It allows you to put 3 messages on your label. I put The best beer on earth! at the top, Matt's Own Brew in the middle and Happy Birthday on the bottom.


Of course you can cut around the label better than I could digitally.

Here is the card template:


I guess you could make Two labels for the two bottle card.. Even more messages!


Related Posts Plugin for WordPress, Blogger...

Blog Archive